Wednesday 30 April 2014

Sketchabilities Reveal #114~


It's that time again! It's time for another Sketchabilities Design Team Reveal. This is my first reveal of my second term, and I am so excited and honoured to be a part of the team again!

Here is my layout for this reveal. I love how it turned out.


I love the bits of texture in Karan's sketches. It opens up lots of possibilities no matter what your scrapping style is.
I reversed the sketch for my layout in order for me to use the photos that I did and the way that I wanted to overlap them.


I chose to use lots of very pretty vintage buttons from my grandmother's sewing box. I really want to play up the gold tones. I also used gold scalloped ribbon I picked up at Target.
The patterned papers are from the Bumble Collection by ADORNit.


I wanted to add a little sparkle to my large Prima flower, so I used DecoArt's Craft Twinkles Writer in Gold. The liquid dries clear, just leaving the sparkle.
I also added some more gold texture to the doily using DecoArt's Vintage Gold, Paper Effects.


The photos I used are special to me, and tell a story in a single image. The image of the horn and tuba actually came from a note card that a friend of ours received. He thought of us and scanned the image to send to us. The image is a perfect representation of our Love Story. Music is what brought us together, and is something that we both love.
Thanks for stopping by to check out my Design Team Reveal #114 for Sketchabilities. Be sure to check out what the rest of the talented design team came up with!

Tuesday 29 April 2014

Farm Birthday~

A little guy that is very special to me has just turned 1!!
I was so very sad that I could not be there for his fabulous Farm themed party, but I did what I do best and I created some scrappy gifts for his Mommy to document the day.

I started with this "Grady is...1" double layout for some of his party photos.


I used the Cold Avocado Soup collection from JilliBean Soup.


I found some great little Jolee's embellishments to go along with my little barn that I drew and cut out.


Then, I added some simple decoration to 2 brag books that hold 4x6 photos. These are for the grandparents to keep birthday memories close at hand.


Then, the final scrappy gift is this cute mini book to hold all the memories from the day.


The cute little stickers, are again from EK Success.


A peek at the pages inside.


Thanks for stopping by and checking out my farm themed scrappy gift.

Monday 28 April 2014

A Closer Look~

Today we are taking a closer look at a class that I recently taught in Sydney.
This bright layout features patterned papers from the Cold Avocado Soup collection from JilliBean Soup.


I introduced the fun of drywall tape to the ladies that night. I picked up this drywall tape at Walmart and it comes yellow. but you can also get white drywall tape. It can add some fun texture to a layout easily. But the white drywall tape can be inked or painted to the colour of your choosing.
Another fun use for drywall tape is to use it as a mask of sorts. Lay it down and use your spritzes and sprays, then just remove the tape.


Thanks for stopping by! Check back soon for more fun with dry wall tape.

Thursday 24 April 2014

Ribbon Award Brooch~

Today I am sharing a cute little project that you can create in preparation for this Mother's Day.
This sweet brooch would be perfect for a Mother's Day brunch, to wear at church or just your family get together.
Who wouldn't want something to make their Mom feel special and loved on not only Mother's Day, but every day!


I used some of the Retro May Arts Ribbon that I was sent to pretty up this brooch.


I used patterned papers from Bella Blvd.


I also used sequins from Teresa Collins to embellish. My Mind's Eye letter stickers, and layers created using EK Success punches.


Thank you so much for stopping by, and I hope you do a little something crafty for your Mom this Mother's Day!

For more crafty inspiration, Find and Follow me on Pinterest:

Tuesday 22 April 2014

Class Close-Up~

Today's post is a closer look at a recent class that I taught in Truro.
Lots of little pieces to work with to create this bloom inspired layout.


I used the My Mind's Eye, Indie Chic collection to create this class. I added some small metal embellishments, flowers and some pink twine for added texture.


Maybe you thought this layout looked a little familiar, well you would be right. The layout below is one that I posted earlier this month. The class for the Cutting Garden was so popular it sold out. So I thought I would share the same design with my Truro peeps as a class.


Thank you so very much for stopping by!
What will you make bloom from your craft space?

Find and Follow me on Instagram to keep up with all my crafty travels:

Thursday 17 April 2014

Upcycled Desk Organizer~

Today I'm sharing a great little upcycle craft that I recently created for my Mom. A pretty little Desk Organizer for her to have by her computer.


Here is a shot of what I started with to create the different holders.


A closer look at all those beautiful May Arts ribbons.


I love this fabulous vintage button I found in my grandmothers button tin.


A great place to have all those things that you would like close by when creating.


Thank you so much for stopping by to check out this crafty desk organizer.
For more crafty inspiration Find and Follow me on:

Wednesday 16 April 2014

Bella Blvd Reveal #1~


Today I am revealing projects that I have created using my April kit from Down a Dirt Road Scrapbooking. The designers took the month of March off, while Alicia of Down a Dirt Road Scrapbooking put the finishing touches on her brand new store!


The April kit is made up of patterned papers and stickers from Bella Blvd's, Molly collection.
A fun and bright collection of patterns, great for photos of birthday sleepovers or a girl's night out!


The photo is from the Gadget Girls photo booth from the Fall Mega Crop 2013! Already booked and looking forward to the Mega Crop 2014!


The next layout features a photo that I adore. Margaret is such a photo ham at times. This photo was taken while out caching in PEI one sunny afternoon, this was one of the caches that we found.....weird! lol


The title features the funky coordinating letter stickers.


My second layout is created using photos from a New Years Day polar dip, 2013.
When I have a series of photos I like to mat them as one, to create the look of a photo strip.


Thanks so much for stopping by to see the first of my April kit reveal! Stay tuned for more scrappy reveals!

Tuesday 15 April 2014

Sketchabilities #113 Reveal~

I am so very excited once again that today is reveal day at Sketchabilities!
I love to head on over to the Sketchabilities blog and check out what all the other talented designers have come up with using the fabulous sketch.


Here is the layout that I created based on Karan's sketch.


I created my layout using patterned papers and chipboard embellishment stickers from My Mind's Eye, the Now & Then collection.


I used a couple of photos from a fun and fabulous day spent at Captain Cob's.
What better way to spend a crisp fall afternoon with great friends.
I picked up the red doily at Michaels a while back, waiting for the perfect layout to use it on.


I added buttons for a little pop of red, from Buttons Galore & More.


Thank you so much for stopping by to check out my Sketchabilities reveal this time around!
I'd love to see you take the challenge and link up to our challenge for Sketch #113.

Monday 14 April 2014

Paper Towel Flower Tutorial~

Today I am sharing a quick tutorial on how to create these sweet and simple Paper Towel Flowers.
The bonus is, that you probably have all that you need to create them in your craft supplies right now!


Step 1-
You need some paper towel. I started with 2 half sheets, and wet them under the tap and squeezed out some of the excess water. Flatten it out in an area that you are not afraid to get a little dirty.

Step 2-
Add your colour! I used a variety of spritzes and sprays for mine. But you can also use ink, re inkers, or dripped fabric dye. The dampness of the paper towel will cause the colour to spread somewhat. Add as much colour as you would like, but keep in mind that it will dry a little lighter than it looks when it is wet.


Step 3-
Let the paper towel dry completely. Yesterday it was actually sunny, so I was able to set it out on the front porch in the sun to speed up the process.

Step 4-
I used a piece of cardstock I cut using a 2.75" circle punch as a template. I traced the circles onto the paper towel using a pencil. Then cut them out using scissors.


Step 5-
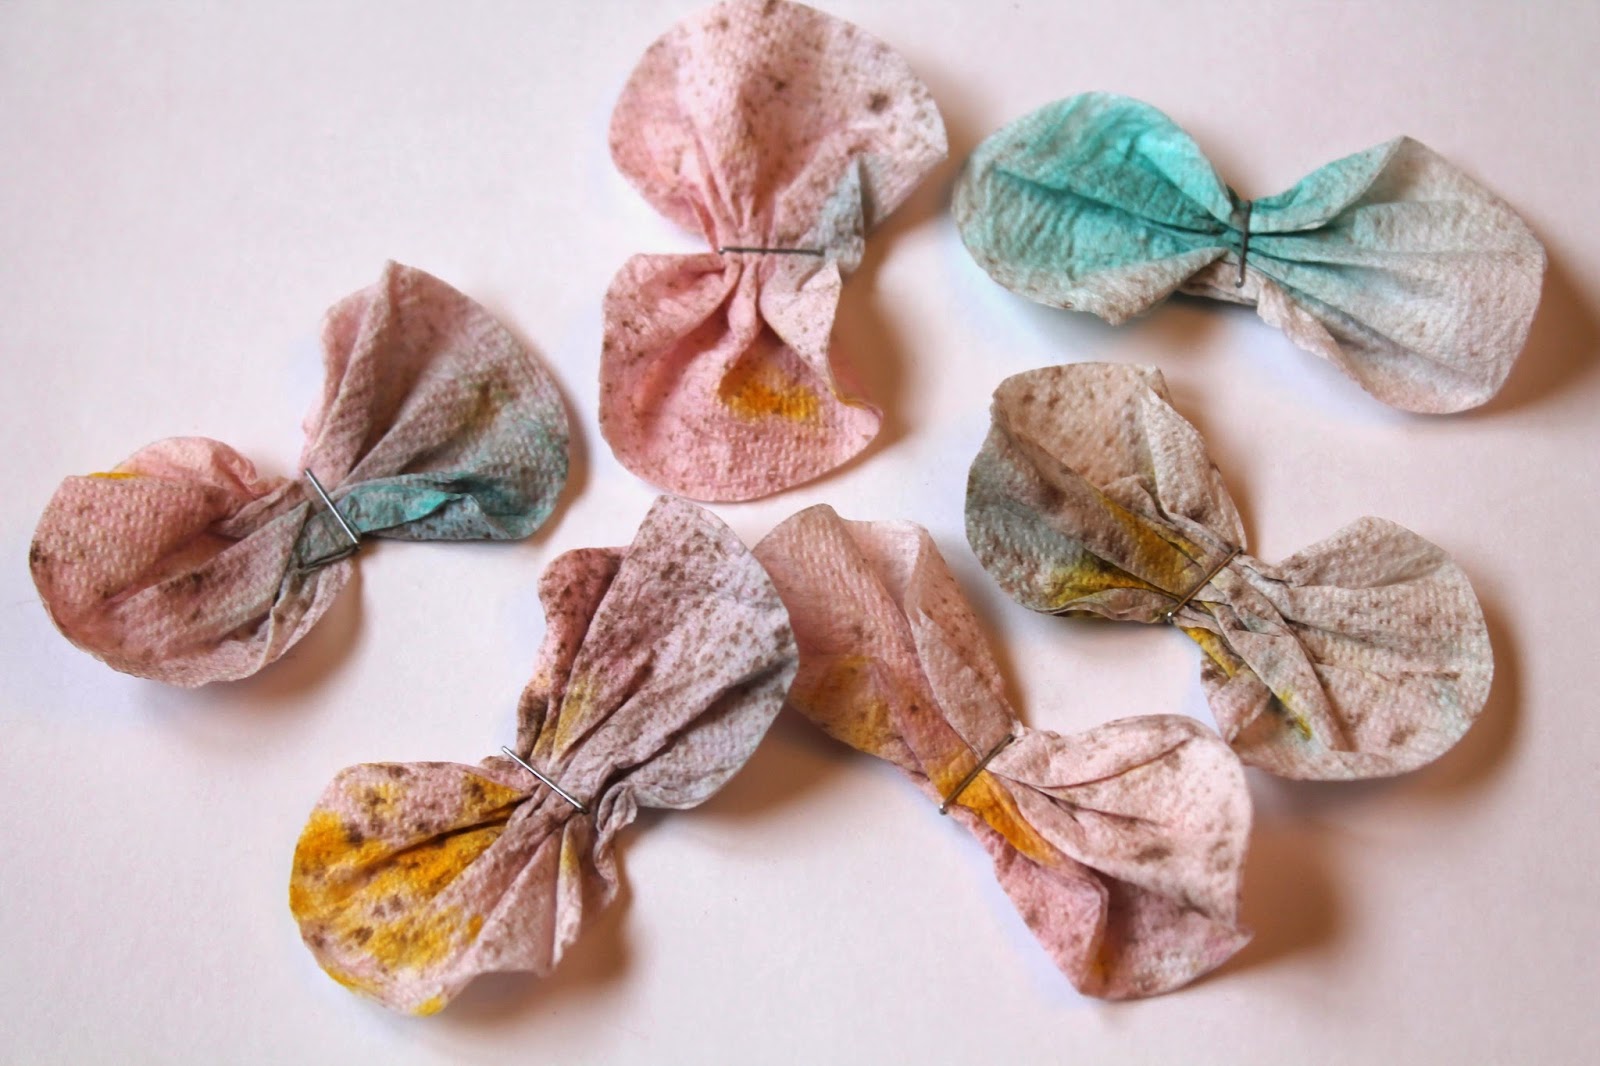
I then gathered each circle in, sort of a ruffle pattern, and pinched it flat in the middle. then took a regular stapler and stapled each into form.


Step 6-
I used a hot glue gun to adhere 3 petal layers together for each flower.


Step 7-
The finishing touch is that, again with a hot glue gun I added a vintage button to the middle of each of my flowers.


Taaa Daaaaaaa! There you have it, sweet and simple to create Paper Towel Flowers!


Thanks for stopping by! Check back again for more crafty goodness!