Monday, 30 June 2014

Sketchabilities Reveal #118~


It's reveal day at Sketchabilities!
I love to work with these fabulous sketches, and I look forward to seeing what all of the other talented designers come up with each and every reveal!

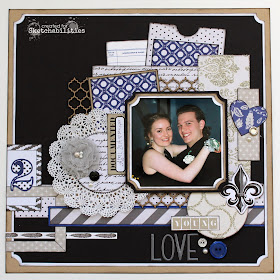
Here is my interpretation of Sketch #118.
I used the Urban Market collection from Teresa Collins. It's glitzy sparkles and bold blues are just so very pretty! Perfect for Zoe and Tyler's semi formal photos.


The stunning grey fabric flower is from The Curtsey Boutique. The pretty, delicate doily came with my fabulous bowl of chicken corn chowder while having lunch with my mother.


The chipboard lattice is from Creative Embellishments and was already the perfect colour for my layout, so I didn't have to do anything to is but incorporate it as a fabulous layer of texture.


Thanks so much for stopping by to check out my Sketch #118 reveal for Sketchabilities! I hope you take the challenge too!

Wednesday, 25 June 2014

May Arts Ribbon Border Tutorial~

I am so very excited to be writing this post today. I am honoured to have been chosen to take part in Round 2 of the May Arts Design Team Challenge. With this post and project I hope to be chosen to be a part of the 2014-2015 May Arts Design Team.


So here we go.
Today I am sharing a tutorial on how to create this elegant ribbon border. Perfect for that very special layout with a favourite photo.


It didn't take me long to figure out what I wanted to do for this project. I also knew that I wanted to use ribbon that had some shine to it. I wanted the end product to shimmer and shine with an ornate look. I compiled my golden wish list of beautiful May Arts ribbon, look at how oh so pretty it is!


Project Recipe:


Step 1: The very first thing that I did was take these pretty pearlized string beads and make them gold as well. I used Gold Dazzling Metallics paint and a foam brush to make the transformation.


Step 2: To create the base of your elegant border, I cut a strip of brown cardstock to 1.75x12. Then I used a gold pen to mark the following measurements: 1.5", 3", 4.5", 6", 7.5", 9", 10.5".
This will be your guide for this entire process.


Step 3: I then cut 3 pieces of the satin grosgrain ribbon that were 4" long. Using my hot glue gun, I attached them as a loop to the border base at the 3, 6 and 9 inch marks.


Step 4: Cut yourself 4 pieces of the Metallic Chain Cord that are each about 4". Once again with your hot glue gun, you are going to attach this ribbon in a scallop fashion. Start at the very end of your border base, and scoop your ribbon to the 3" mark. The next piece will go from the 3" mark to the 6" mark, and so on.


Step 5: I cut my painted gold string beads to, again...about 4" long (19 beads to be exact). You will need 4, maybe 5 lengths of this. Don't get too far away from the hot glue gun, this time you are going to attach the beads starting at the 1.5" mark and scooping it over to the 4.5" mark. From the 4.5" mark to the 7.5" mark and so on.
Now, the slightly tricky part is the ends. If you scroll up and take a quick peek at the finished product again, you will see that to continue the pattern, I have a half scallop on each end. All you're going to do is attach one end to the 1.5" and scoop it down like the others, where it crosses the gold cord scallop, you are going to attach it with a tiny dab of hot glue.
Cut off any ribbon or cord that is now hanging over the ends of your border.


Step 6: The top piece of the border is pretty simple. I layered some patterned paper and some coordinating cardstock. Then I cut a piece of the gold velvet ribbon to about 14" long. I ran a narrow strip of double sided tape up the middle of my paper border and adhered the ribbon to it. Instead of cutting ribbon to exactly 12", I always cut it longer and wrap it around the back. It makes for a much cleaner look.


Step 7: Now you are going to be attaching your top border strip to your bottom border strip. Because your bottom strip is quite thick due to all of it's layers, I used 3D foam dots. Lots of them. The last thing you want now is your border to sag at any point. Then just simply place the top border on the bottom.


Taaaaa Daaaaa!!
You have created a stunning, elegant and SPARKLY ribbon border!


Here is a closer look at the finished product. I thought the Market Street collection from My Mind's Eye was the perfect match to my ribbon border.
I chose one of my favourite photos of my husband and I, from our engagement photo shoot. I thought the shine of our brass instruments worked perfectly with glitz of the layout.


If you look closely there is shimmer all over this layout. 


There it is, the finished ribbon border, looking beautiful on the layout.


Thank you so much for stopping by to see my Round 2 project to hopefully be a part of the May Arts Ribbonistas!

Tuesday, 24 June 2014

Sisters & Friends~

Our beautiful girls are so very lucky to have one another. Not only are they sisters, they really are best friends who enjoy spending time with one another.
They are so very different, but those differences really do compliment each other, making them the perfect pair!

This is a pretty layout dedicated to Sisters & Friends.
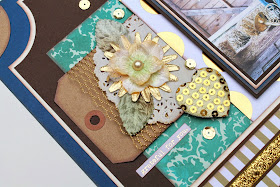
I have been wanting to craft with this oh so pretty chipboard frame from Creative Embellishments. So I finally sat down to create.
The patterned papers and embellishments are from the Save the Date collection by Teresa Collins.


I took the plain chipboard frame and first painted it using Americana Multi Surface Satin White paint. I wanted the frame to really sparkle, so while the paint was still wet I added a layer of Glamour Dust.
The Americana Paint and Glamour Dust glitter are both by DecoArt.


I used this 3D foam tape under multiple layers to create lots of dimension.
The sweet little white tags are from the Curtsey Boutique.


DecoArt is offering a great deal for US addresses!

Coupon code GLITTER has been set up to allow FREE shipping to any purchases that include items from these categories:
DCT (Craft Twinkles 2oz)
DCTW (Craft Twinkles Writers)
DGD (Glamour Dust Glitter Paint)

This coupon is valid for US addresses only from 6/22 through 6/30.


Thank you so much for stopping by!

Monday, 23 June 2014

Great Times With Friends~

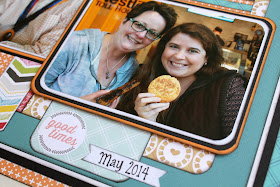
The reason I scrapbook is to capture my memories of all the good times.
I cherish my family and friends, and my layouts posted today are dedicated to my fabulous friends.

The first layout is created using patterned papers from the Capture Life collection from Echo Park. The bright colours and funky patterns were perfect for these photos.


I created the title using a few different accent and letter stickers.


My second layout of this post features the sweet little face of Grady. Love this little man!
Lisa took this fantastic photo and I just couldn't wait to scrapbook it....but I waited until I found the right patterns. I used patterned paper from the Suave collection by Authentique.


Whenever I scrapbook winter photos, I like to play up the sparkle.


I used these great little banner letter stickers from Pink Paislee, for my Cozy Cutie title.


Thanks so much for stopping by!

Thursday, 19 June 2014

Perfect Vacation~


This month's kit from Down a Dirt Road Scrapbooking features patterned papers and embellishments from the Perfect Vacation collection from Imaginisce.
This collection is bright and fun, and is perfect for almost any family vacation....whether you are close to home or far far away.
So here is my June Kit reveal!!

First is a layout I created for my brother's France vacation album.


My second project is a simple Travel Journal.


I chose to scrapbook some more of my brother's trip to France with this collection.


My final layout is one I created using photos taken while geocaching in PEI.


Last but not least, a sweet and simple little card using some of the sweet coordinating embellishments.


Thank you for stopping by to check out my reveal for Down a Dirt Road Scrapbooking!

Tuesday, 17 June 2014

Happy Tails~

Our furry family member is the feature of this blog post!
Her name is Kya, but she often gets "Poochie". This layout is created using patterned papers from the Happy Tails collection by Bo Bunny. How cute is that collection name?? The fun colours and patterned are perfect for any of man's best friends!


I added some brads and a metal tag embellishment to create the look of a dog collar border.


The Happy Tails collection and all embellishments are available at The Cutting Garden.
Thank you so much for stopping by!

Sunday, 15 June 2014

Sketchabilities Reveal #117~


Today is the day for another Sketchabilities Design Team Reveal!
I love creating, and I have had so much fun creating with all of these Sketchabilities sketches. This week's sketch is no exception.
Here is my layout created using a photo of my beautiful wedding bouquet.


I loved my bouquet so much. I created it using map rosettes, coffee filter roses and feathers made from sheet music. I had been waiting to scrapbook the photo of it, and everything just came together for the perfect layout to showcase the photo.

I used map flowers from the Curtsey Boutique, and patterned papers from the Save the Date Collection by Teresa Collins.


I used chipboard leaves from Creative Embellishments to accent my pretty map flowers. I painted the chipboard using white DecoArt Multi Surface paint, and then added a little shine using Gold Twinkle Writers, also from DecoArt. The sequins from Teresa Collins also adds a little sparkle.
The Save the Date collection by Teresa Collins is available at The Cutting Garden.


I used the same White Multi Surface paint to distress the cardstock in the background. I adore the texture of the patterns in this Teresa Collins collection.
I added this pink tag and black & white baker's twine from Curtsey Boutique.


Thank you so much for stopping by to check out another Sketchabilities Design Team Reveal. Be sure to check out the Sketchabilities blog and see what all of the other talented designers came up with for this fabulous sketch.

For more crafty inspiration, find and follow me on Pinterest!